Spring Cloud Hystrix
Spring Cloud Hystrix
介绍
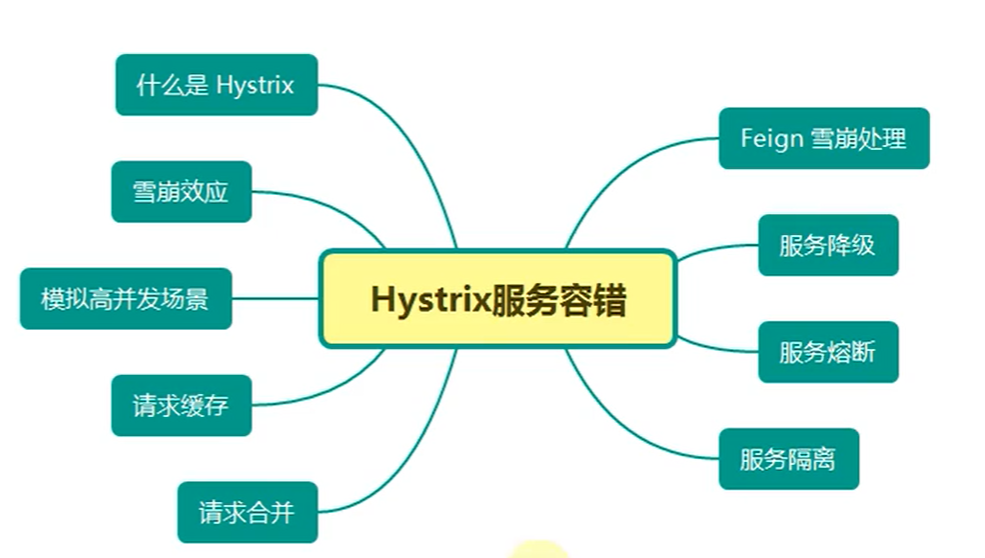
Hystrix 解决服务不可用时的解决方案
雪崩: 某个服务导致的问题导致的其他服务链路整个不可用
什么是hystrix
hystrix 是Netflix公司内部的服务容灾处理解决方案
雪崩效应
一个请求调用多个服务很常见。
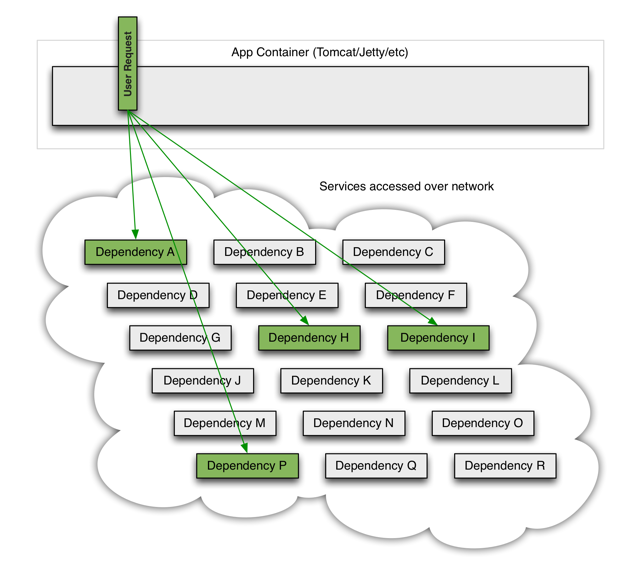
某一个服务故障或者延迟会导致系统资源迅速耗尽或者系统出现不可信结果。
原因归结为三类:
- 服务提供不可用
- 重试导致的流量加大
- 服务消费者不可用
解决方案
请求缓存
将一个请求与放回结果做缓存处理
请求合并
将相同的请求合并然后用批处理接口;
服务隔离
限制调用分布式资源,某一个调用服务出现问题不会影响服务调用。
服务熔断
牺牲局部服务,保证全体系统稳定措施;
服务降级
服务熔断以后可以断调用自己本地方法返回缺省值;
问题对应方案mapping
高并发场景:
请求缓存:
- 通过raids等技术通过缓存降低后续服务调用频率
请求合并:
- 比如查询多次不同的ID查询,可以合并为一次查询列表。
平凡调用查询商品列表导致查询ID等小资源消耗的服务响应缓慢
- 我们可以隔离微服务的资源。使用服务隔离
- 线程池隔离
- 信号量隔离
- 我们可以隔离微服务的资源。使用服务隔离
服务熔断
- 某个服务负载太高熔断处理
服务降级
- 后续服务无法调用返回缺省值,默认值
雪崩
异常服务可能会hold住一系列的请求
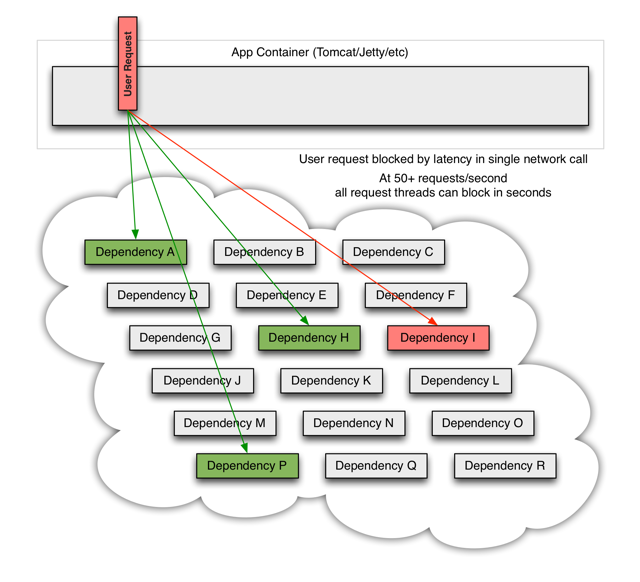
导致很多服务请求被控制住。导致系统崩溃。
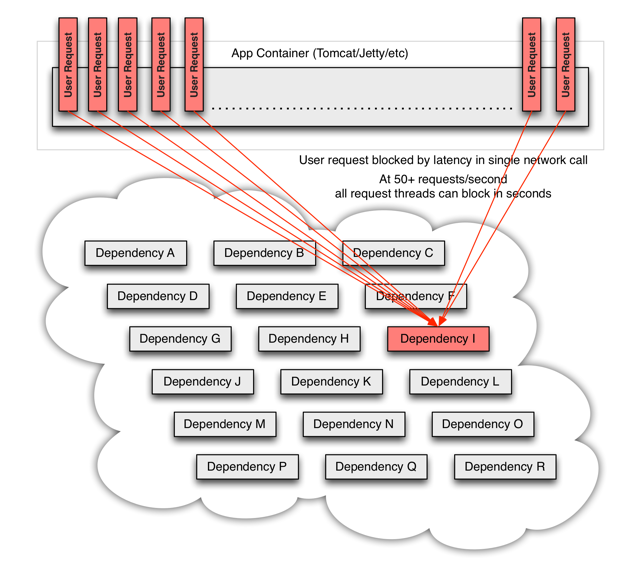
总结,一个服务不可用导致一系列服务不可用。
解决方案
请求缓存
请求合并
服务隔离
服务熔断
服务降级
熔断后通常要降级
环境准备
要有服务调用
模拟并发场景
在product list方法中中配置一个等待时间
1
2
3
4
5
try {
TimeUnit.SECONDS.sleep(2);
} catch (InterruptedException e) {
e.printStackTrace();
}在消费者中配置一个线程限制数量
1
2
3
4
5
server:
port: ${SERVICE_PORT:18580}
tomcat:
threads:
max: 10 # 视频的路径是max-threads:10 是错误的制造一个人为的等待超时
另外写一个从order调用到productById的方法
用JMeter做压力测试
点击开始后再调用http://localhost:18580/order/product/2
会发现这个作业也要等待10秒
JMeter 压力测试
性能压力测试工具
使用它来测试服务承受压力并且适用熔断。
下载一个: http://jmeter.apache.org/download_jmeter.cgi
解压并运行
在bin中的jmeter.sh 或者jmeter.jar 双击运行
修改编码格式
jmeter.properties
1
2
3
4
5
#language=en
language=zh_CN
#sampleresult.default.encoding=ISO-8859-1
=UTF-8添加一个setUp线程组
50个线程每个线程执行50次
在线程组中添加一个HTTP请求
添加相应的参数
在线程组中添加一个结果查看器
请求缓存
通过redis 做请求缓存来降低服务器延时
Hystrix自带的缓存是本地缓存无法满足集群需求。
并且Hystrix无法和第三方容器整合使用如MemChe
所以这里用redis做缓存
用docker 启动一个
1
2
3
4
5
6
7
8
9
10
11
12
services:
redis:
image: redis:buster
volumes:
- ./datadir:/data
- ./conf/redis.conf:/etc/redis/redis.conf
- ./logs:/logs
command: redis-server --requirepass 123456
restart: always
ports:
- 16379:6379
~安装redis管理器RedisDesktopManager
添加依赖包
- org.springframework.boot spring-boot-starter-data-redis
参考文档
redis:https://docs.spring.io/spring-data/redis/docs/2.5.5/reference/html/#reference
修改application.yml
1
2
3
4
5
6
7
8
9
10
11
12
13
spring:
redis:
host: 127.0.0.1 #host
port: 16379 #port
timeout: 10000 #超时时间
database: 0 #数据库名称
password: 123456
lettuce:
pool:
max-active: 64 #最大连接数
max-wait: 10000 #最大等待时间
max-idle: 16 #最大空闲
min-idle: 8 #最小空闲pom.xml 中添加
1
2
3
4
5
6
7
8
9<dependency>
<groupId>org.springframework.boot </groupId>
<artifactId>spring-boot-starter-data-redis</artifactId>
<version>${spring-boot.version}</version>
</dependency>
<dependency>
<groupId>org.apache.commons</groupId>
<artifactId>commons-pool2</artifactId>
</dependency>必须要使用commons-pool2才能正常调用redis这相当于mysql driver
启动类要激活
@EnableCaching注解编写RedisConfig 在 org.akachi.eurekademo.order.config中
1
2
3
4
5
6
7
8
9
10
11
12
13
14
15
16
17
18
19
20
21
22
23
24
25
26
27
28
29
30
31
32
33
34
35
36
37
38
39
40
41
42
43
44
45
46
47
48
49
50
51
52
53
54
55
56
57
58
59
60
61
62
63
64
65
66
67
68
69
70
71
72
73
74
75
76
77
78
79
80
81
package org.akachi.eurekademo.order.config;
import com.fasterxml.jackson.annotation.JsonAutoDetect;
import com.fasterxml.jackson.annotation.JsonTypeInfo;
import com.fasterxml.jackson.annotation.PropertyAccessor;
import com.fasterxml.jackson.databind.ObjectMapper;
import com.fasterxml.jackson.databind.jsontype.impl.LaissezFaireSubTypeValidator;
import org.springframework.context.annotation.Bean;
import org.springframework.context.annotation.Configuration;
import org.springframework.data.redis.cache.RedisCacheConfiguration;
import org.springframework.data.redis.cache.RedisCacheManager;
import org.springframework.data.redis.connection.RedisConnectionFactory;
import org.springframework.data.redis.core.RedisTemplate;
import org.springframework.data.redis.serializer.Jackson2JsonRedisSerializer;
import org.springframework.data.redis.serializer.RedisSerializationContext;
import org.springframework.data.redis.serializer.RedisSerializer;
import org.springframework.data.redis.serializer.StringRedisSerializer;
import java.time.Duration;
import static org.springframework.data.redis.cache.RedisCacheConfiguration.defaultCacheConfig;
/**
* @Author akachi
* @Email zsts@hotmail.com
* @Date 2021/11/17 20:07
*/
public class RedisConfig {
public RedisTemplate<String, Object> redisTemplate(RedisConnectionFactory redisConnectionFactory) {
// 为了开发方便,一般使用<String, Object>
RedisTemplate<String, Object> template = new RedisTemplate<>();
template.setConnectionFactory(redisConnectionFactory);
// Json序列化配置
Jackson2JsonRedisSerializer jackson2JsonRedisSerializer = new Jackson2JsonRedisSerializer(Object.class);
StringRedisSerializer stringRedisSerializer = new StringRedisSerializer();
// 设置key的序列化方式
template.setKeySerializer(stringRedisSerializer);
// 设置hashkey的序列化方式
template.setHashKeySerializer(stringRedisSerializer);
// 设置value的序列化方式
template.setValueSerializer(jackson2JsonRedisSerializer);
// 设置hashvalue的序列化方式
template.setHashValueSerializer(jackson2JsonRedisSerializer);
template.afterPropertiesSet();
return template;
}
public RedisCacheManager myRedisCacheManager(RedisConnectionFactory redisConnectionFactory) {
RedisSerializer<String> redisSerializer = new StringRedisSerializer();
Jackson2JsonRedisSerializer jackson2JsonRedisSerializer = new Jackson2JsonRedisSerializer(Object.class);
ObjectMapper om = new ObjectMapper();
om.setVisibility(PropertyAccessor.ALL, JsonAutoDetect.Visibility.ANY);
om.activateDefaultTyping(LaissezFaireSubTypeValidator.instance ,
ObjectMapper.DefaultTyping.NON_FINAL, JsonTypeInfo.As.PROPERTY);
jackson2JsonRedisSerializer.setObjectMapper(om);
// 配置序列化(解决乱码的问题)
RedisCacheConfiguration config = RedisCacheConfiguration.defaultCacheConfig()
.serializeKeysWith(RedisSerializationContext.SerializationPair.fromSerializer(redisSerializer))
.serializeValuesWith(RedisSerializationContext.SerializationPair.fromSerializer(jackson2JsonRedisSerializer))
.disableCachingNullValues();
RedisCacheManager cacheManager = RedisCacheManager.builder(redisConnectionFactory).cacheDefaults(config).build();
return cacheManager;
}
}业务类上加入缓存
1
@Cacheable(cacheNames = "orderService:product:list")
LocalDateTime 类型会报错所以要加上注解
1
2
总结:
- 引入包
- 搭建redis环境
- 创建
@Configuration类
- 创建
@Bean RedisTemplate- 创建
@Bean RedisCacheManager- 创建
@EnableCacheing- 在需要缓存的地方引入
@Cacheable注解
请求合并
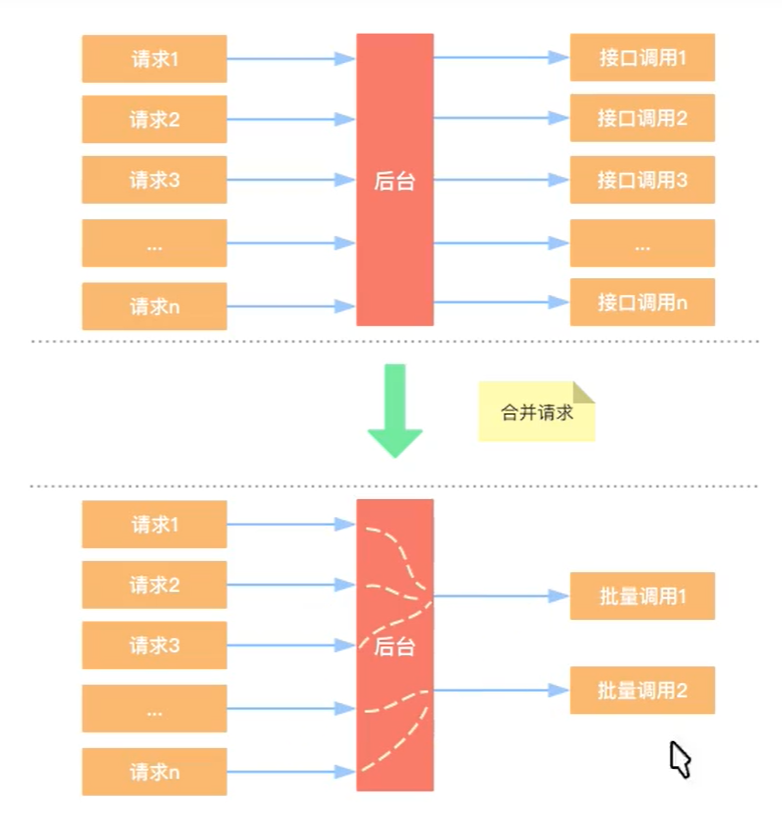
请求合并的情况下必须有一个基础等待时间,比如100ms,在这个等待时间中等待其他的请求来合并请求
多个请求ID一次调用。
添加依赖
pom.xml1
2
3
4
5<dependency>
<groupId>org.springframework.cloud</groupId>
<artifactId>spring-cloud-starter-netflix-hystrix</artifactId>
<version>2.2.9.RELEASE</version>
</dependency>创建一个product/{id}接口和一个product/listbyid?ids=[]接口
在order端也实现他们之间的调用
通过
@HystrixCommand和@HystrixCollapser读音:kə'læpsər(折叠器) 进行分发原来product接口直接返回Product 现在需要修改为Future
java.util.concurrent.Future在批量方法上加入
@HystrixCommand在单个方法上加入
@HystrixCollapser1
2
3
4
5
6在启动类开启熔断器注解
@EnableHystrix封装了@EnableCircuitBreaker

请求合并成功!
服务隔离
默认情况下服务的线程资源是统一的。
某些高消费的服务请求的等待会占用线程池,导致低消费的服务也进入线程池的资源等待列表中。
服务隔离 就是通过限制每个服务占用资源的方式来保证就算高消耗服务占用了资源低消耗服务仍然能够拿到足够完成请求的资源。
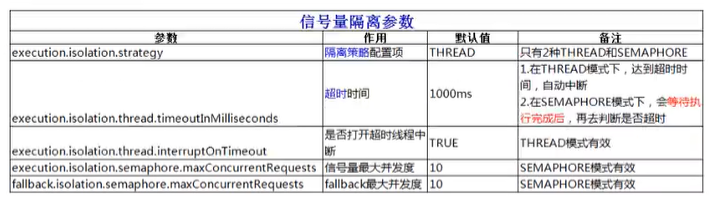
@HystrixCommand 注解参数说明:
线程池隔离
首先添加依赖pom.xml
1
2
3
4
5<dependency>
<groupId>org.springframework.cloud</groupId>
<artifactId>spring-cloud-starter-netflix-hystrix</artifactId>
<version>2.2.9.RELEASE</version>
</dependency>在启动类开启熔断器注解
@EnableHystrix封装了@EnableCircuitBreaker在list*这个在之前就就已经写了等待两秒了* 添加日志打印线程名
java代码 为getProducts 和getProduct 加入了注解并且加入了一个托底方法getProductsFallback
1
2
3
4
5
6
7
8
9
10
11
12
13
14
15
16
17
18
19
20
21
22
23
24
25
26
27
28
29
30
31
32
33
34
35
36
37
38
39
40
41
42
43
44
45
46
47
48
49
50
51
52
53
54
55
56
57
58
59
60
61
62
63
64
65
66
67
68
69
//@Cacheable(cacheNames = "orderService:product:list")
//声明它是需要做服务容错的
//然后最服务隔离
public List<Product> getProducts() {
ResponseEntity<List<Product>> responseEntity = restTemplateBalancer.exchange(
"http://EUREKADEMO-SERVICE-PRODUCT/product/list",
HttpMethod.GET,
null,
new ParameterizedTypeReference<List<Product>>() {
});
return responseEntity.getBody();
}
//不查询productList的数据
private List<Product> getProductsFallback(){
//托底数据
List<Product> products = new ArrayList<>();
products.add(new Product().setCode("-1").setName("無法獲得數據").setManufacture("-1"));
return products;
}
public Product getProduct( String code) {
ResponseEntity<Product> responseEntity = restTemplateBalancer.exchange(
"http://EUREKADEMO-SERVICE-PRODUCT/product/" + code,
HttpMethod.GET,
null,
new ParameterizedTypeReference<Product>() {
});
return responseEntity.getBody();
}getProductsFallback 就是服务降级所用的具体方法
使用Apache JMeter来进行测试
1
maxQueueSize
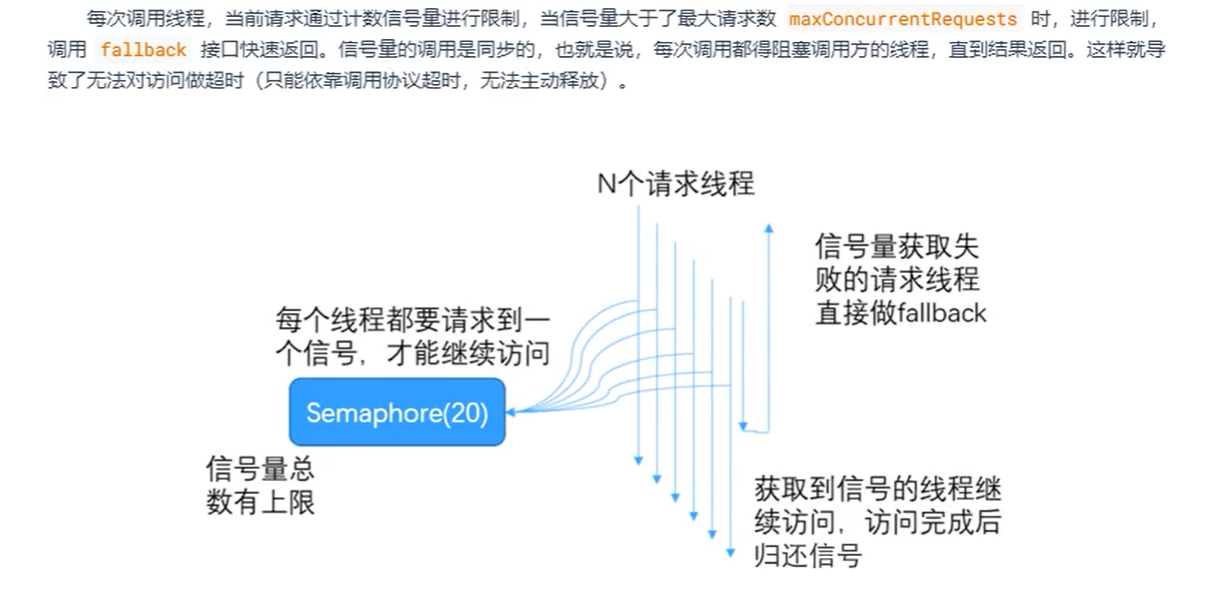
信号量隔离
线程池隔离会比较平凡的创建和销毁线程
添加maven依赖
修改注解
新增一个requestsService来测试新功能
1
2
3
4
5
6
7
8
9
10
11
12
13
14
15
16
17
18
19
20
21
22
23
24
25
26
27
28
29
30
31
32
33
34
35
36
37
38
39
40
41
42
43
44
45
46
47
48
49
50
51
52
53
54
55
//@Cacheable(cacheNames = "orderService:product:list")
//声明它是需要做服务容错的
//然后最服务隔离
public List<Product> getProducts() {
log.warn(Thread.currentThread().getName() + "-getProducts");
ResponseEntity<List<Product>> responseEntity = restTemplateBalancer.exchange(
"http://EUREKADEMO-SERVICE-PRODUCT/product/list",
HttpMethod.GET,
null,
new ParameterizedTypeReference<List<Product>>() {
});
return responseEntity.getBody();
}
//不查询productList的数据
private List<Product> getProductsFallback(){
//托底数据
List<Product> products = new ArrayList<>();
products.add(new Product().setCode("-1").setName("無法獲得數據").setManufacture("-1"));
return products;
}
public Product getProduct( String code) {
log.warn(Thread.currentThread().getName() + "-getProduct");
ResponseEntity<Product> responseEntity = restTemplateBalancer.exchange(
"http://EUREKADEMO-SERVICE-PRODUCT/product/" + code,
HttpMethod.GET,
null,
new ParameterizedTypeReference<Product>() {
});
return responseEntity.getBody();
}主要在HystrixCommand中指定了信号量调用方式
用apache JMater测试 线程数量设置为6
再用浏览器请求只能拿到托底数据。
要注意使用apache JMater时选择具体的线程组右键执行。
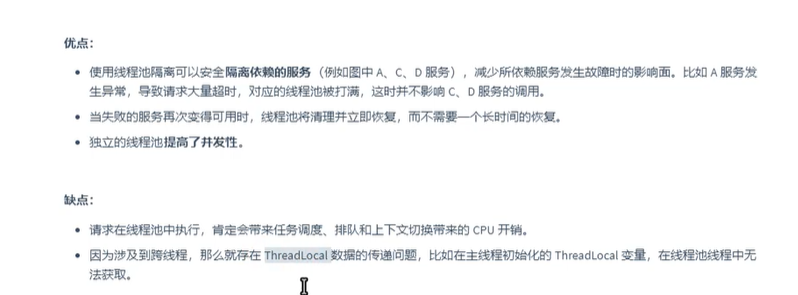
区别
线程隔离
请求线程和Provider线程不是用一条线程
支持超时可直接放回
支持熔断
隔离原理:每个服务单独线程池
支持同步和异步两种方式
资源消耗大上下文切换、排队、调度等、容易造成负载高
无法传递 HTTP Header
- 可传递HTTP Header。
信号量隔离
- 请求和线程使用同一个Provider线程。
不支持超时
- 支持熔断,信号量达到MaxConcurrentRequests后再请求返回fallbac进行熔断。
隔离原理:通过信号量计数器;
- 同步调用,不支持异步
资源消耗小,只是个计数器。
适用于请求量较大的服务
服务熔断
服务熔断一般是指软件系统中,由于某些原因出现了过载现象,为了防止整个系统故障,从而采用的一种保护措施,所以很多地方吧熔断称之为过载保护。
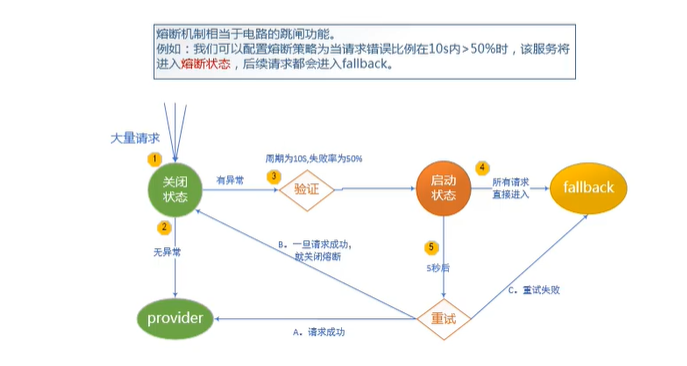
- 如果服务无法正常请求则开启熔断机制并且返回fallback数据。
- 一段时间内重试provider如果重试失败率低于周期失败率阈值则关闭熔断。
- 关键性参数
- 熔断周期
- 熔断失败率阈值
- 重试周期
添加依赖 hystrix
在业务上声明注解
1
2
3
4
5
6
7
8
9
10
11
12
13
14
15
16
17
18
19
20
21
22
23
24
25
26
27
28
29
30
31
32
33
34
35
36
37
38
39
40
41
42
43
44
45package org.akachi.eurekademo.order.service.impl;
import com.netflix.hystrix.contrib.javanica.annotation.HystrixCommand;
import com.netflix.hystrix.contrib.javanica.annotation.HystrixProperty;
import com.netflix.hystrix.contrib.javanica.conf.HystrixPropertiesManager;
import lombok.extern.slf4j.Slf4j;
import org.akachi.eurekademo.order.service.ProductService;
import org.akachi.eurekademo.product.model.Product;
import org.springframework.stereotype.Service;
import java.util.List;
/**
* @Author akachi
* @Email zsts@hotmail.com
* @Date 2021/11/17 21:19
*/
public class ProductServiceRequestsImpl extends ProductServiceImpl implements ProductService {
public List<Product> getProducts() {
log.warn("run products");
return super.getProducts();
}
public List<Product> getProductsFallback(){
log.warn("run getProductsFallback");
return super.getProductsFallback();
}
}修改application.yml
1
2
3spring:
main:
allow-bean-definition-overriding: true注解参数解析
circuitBreaker.requestVolumeThreshold
统计熔断颗粒度,默认20
circuitBreaker.errorThresholdPercentage
熔断失败概率
circuitBreaker.sleepWindowInMilliseconds
多久重试一次 默认5s
熔断成功

服务降级
不做隔離、不做熔斷直接使用fallbackMethod就是服務降級
@HystrixCommand(fallbackMethod = "getProductsFallback")
Feign雪崩处理
参考spring Cloud Feign-学习笔记
服务监控
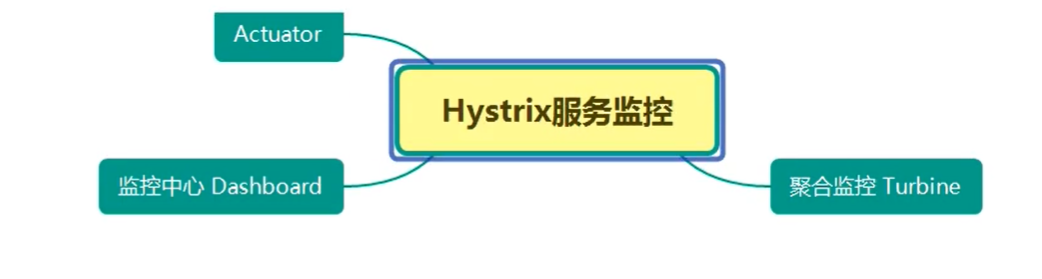
Actuator
添加依赖
1
2
3
4
5<dependency>
<groupId>org.springframework.boot</groupId>
<artifactId>spring-boot-starter-actuator</artifactId>
<version>2.5.5</version>
</dependency>暴露hystrix.stream端点
1
2
3
4
5management:
endpoints:
web:
exposure:
include: hystrix.stream # '*'也行通过actuator可以看所有的端点
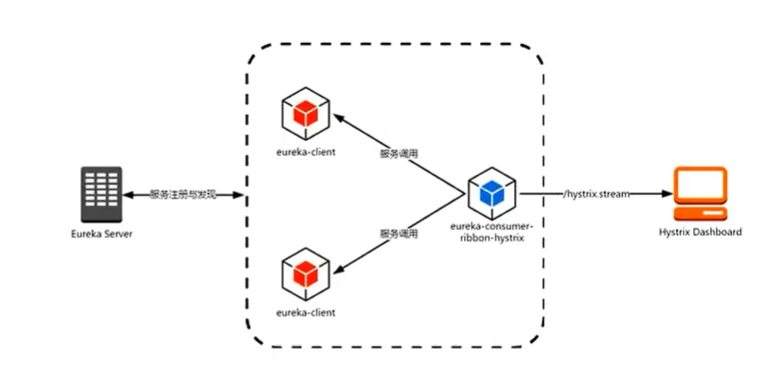
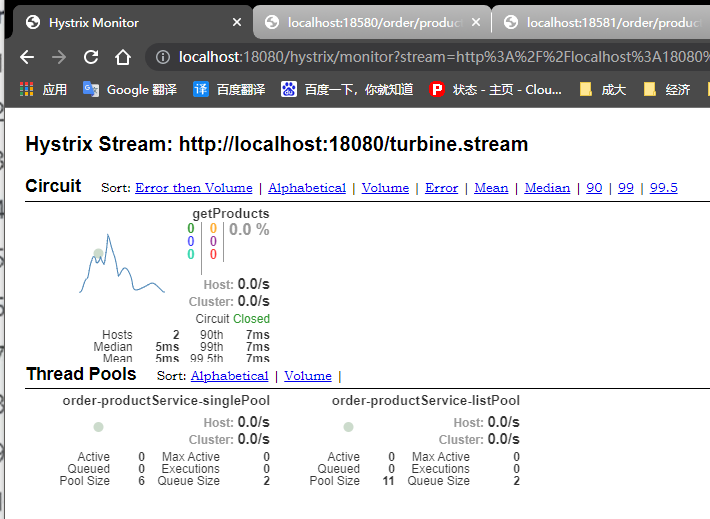
/actuator/hystrix.stream
Tubine
可以把其他端点都聚过来
监控中心
添加一个dashboard的依赖
- spring-cloud-starter-netflix-hystrix-dashboard
1 | <dependency> |
启动类加入
@EnableHystrixDashboard访问http://localhost:18580/hystrix 监控界面就有了
输入监控端
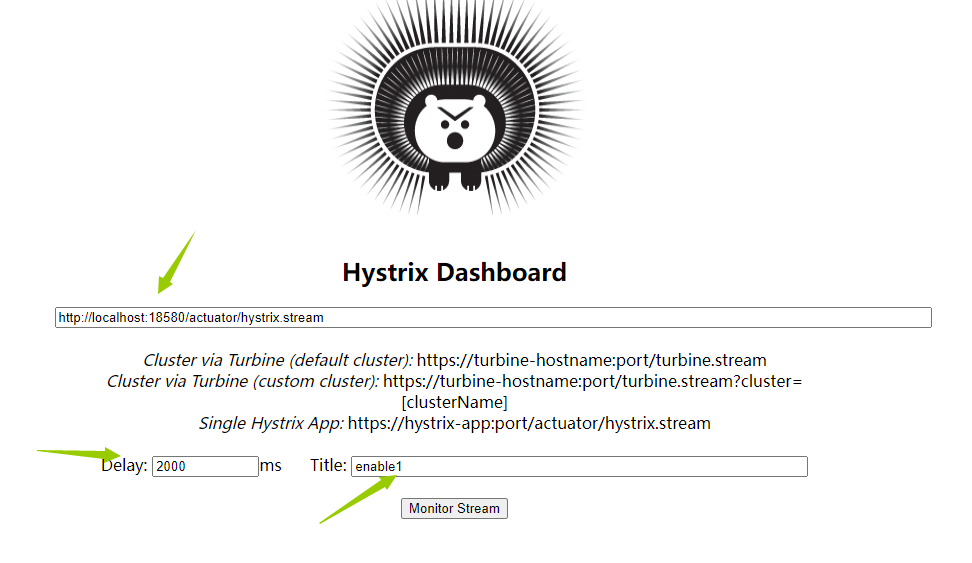
输入后仍然会无法连接
报错:
Unable to connect to Command Metric Stream.- 修改配置文件加入localhost的访问
1
2
3hystrix:
dashboard:
proxy-stream-allow-list: "localhost"错误解决!

参数解释
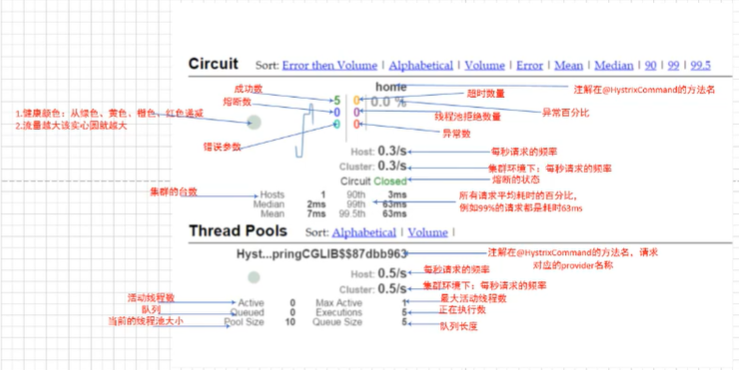
参考文档: https://docs.spring.io/spring-cloud-netflix/docs/2.2.10.RELEASE/reference/html/
聚合监控
在多个项目中启用监控中心,监控起来会很麻烦。
另外做了大量测试只有用Hystrix框架的调用才可以监控。
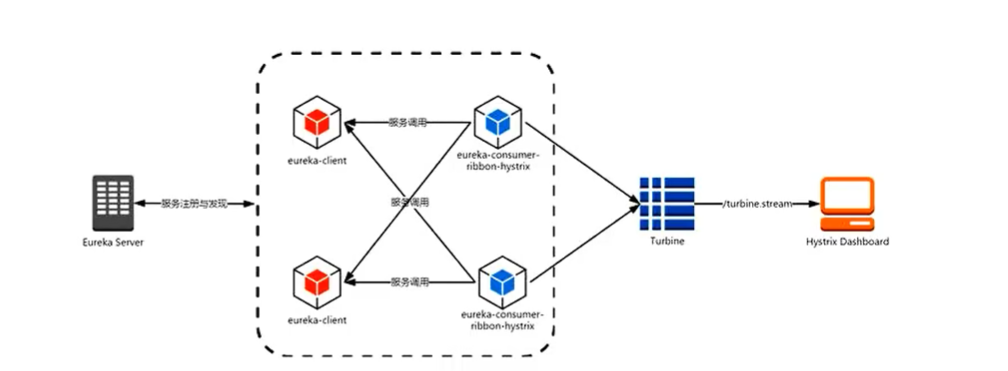
聚合监控需要搭建一个独立的项目
创建新项目 hystrix-turbine
- 添加Netflix-turebine依赖
- application启动类加入@EnableTurbine
- 配置文件中注册如eureka,通过服务名配置turbine监控
application.yml
1
2
3
4
5
6
7
8
9
10
11
12
13
14
15
16
17
18
19
20
21
22
23
24
25
26
27server:
port: ${SERVICE_PORT:18080}
spring:
application:
name: hystrix-turbine
cloud:
inetutils:
ignoredInterfaces: ['VM*','ingress'] # 必须过滤掉VMware 因为会豁达86.1
preferred-networks:
- ${NET_DOMAIN:192.168/16} #必须只选择192网段的否则会选择一些虚拟机网卡
eureka:
instance:
prefer-ip-address: true
# instance-id: ${spring.cloud.client.ip-address}:${server.port} #必须加入名字和端口否则ID会相同
client:
register-with-eureka: true # 将自己注册到注册中心 默认 true
fetch-registry: true # 是否从注册中心获取服务注册信息 默认true
service-url:
defaultZone: http://root:123456@localhost:18761/eureka/,http://root:123456@localhost:18762/eureka/,http://root:123456@localhost:18763/eureka/
hystrix:
dashboard:
proxy-stream-allow-list: "*"
turbine:
# 可调用的服务用逗号分割
app-config: eurekademo-service-order-concurrency-test,eurekademo-service-product
# 指定集群名
cluster-name-expression: "'default'"pom.xml
1
2
3
4
5
6
7
8
9
10
11
12
13
14
15
16
17
18
19
20
21
22
23
24
25
26
27
28
29
30
31
32
33
34
35
36
37
38
39
40
41
42
43
44
45
46
47
48
49
50
51
52
53
54
55
56
57
58
59
60
61
62
<project xmlns="http://maven.apache.org/POM/4.0.0"
xmlns:xsi="http://www.w3.org/2001/XMLSchema-instance"
xsi:schemaLocation="http://maven.apache.org/POM/4.0.0 http://maven.apache.org/xsd/maven-4.0.0.xsd">
<parent>
<artifactId>eurekademo</artifactId>
<groupId>org.akachi</groupId>
<version>1.0-SNAPSHOT</version>
</parent>
<modelVersion>4.0.0</modelVersion>
<groupId>org.akachi.eurekademo</groupId>
<artifactId>hystrix-turbine</artifactId>
<version>0.0.1-SNAPSHOT</version>
<name>order-concurrency-test</name>
<description>Demo project for Spring Boot</description>
<properties>
<maven.compiler.source>11</maven.compiler.source>
<maven.compiler.target>11</maven.compiler.target>
<java.version>11</java.version>
<spring-cloud.version>2020.0.4</spring-cloud.version>
<spring-boot.version>2.5.5</spring-boot.version>
<netflix-eureka-server.version>3.0.4</netflix-eureka-server.version>
<netflix-netflix.version>2.2.10.RELEASE</netflix-netflix.version>
</properties>
<dependencies>
<dependency>
<groupId>org.springframework.boot</groupId>
<artifactId>spring-boot-starter-web</artifactId>
<version>${spring-boot.version}</version>
</dependency>
<dependency>
<groupId>org.springframework.cloud</groupId>
<artifactId>spring-cloud-starter-netflix-eureka-client</artifactId>
<version>${netflix-eureka-server.version}</version>
</dependency>
<dependency>
<groupId>org.springframework.cloud</groupId>
<artifactId>spring-cloud-starter-netflix-hystrix</artifactId>
<version>2.2.10.RELEASE</version>
</dependency>
<dependency>
<groupId>org.springframework.cloud</groupId>
<artifactId>spring-cloud-starter-netflix-hystrix-dashboard</artifactId>
<version>2.2.10.RELEASE</version>
</dependency>
<dependency>
<groupId>org.springframework.cloud</groupId>
<artifactId>spring-cloud-starter-netflix-turbine</artifactId>
<version>2.2.10.RELEASE</version>
</dependency>
</dependencies>
<build>
<plugins>
<plugin>
<groupId>org.springframework.boot</groupId>
<artifactId>spring-boot-maven-plugin</artifactId>
</plugin>
</plugins>
</build>
</project>Turbine.java
1
2
3
4
5
6
7
8
9
10
11
12
13
14
15
16
17
18
19package org.akachi.eurekademo.turbine;
import org.springframework.boot.SpringApplication;
import org.springframework.boot.autoconfigure.SpringBootApplication;
import org.springframework.cloud.netflix.hystrix.EnableHystrix;
import org.springframework.cloud.netflix.hystrix.dashboard.EnableHystrixDashboard;
import org.springframework.cloud.netflix.turbine.EnableTurbine;
public class TurbineApplication {
public static void main(String[] args) {
SpringApplication.run(TurbineApplication.class, args);
}
}
可以对多个服务进行监控
参考资料
视频教程: https://www.bilibili.com/video/BV1hf4y1r7Kb?p=2
JMeter: http://jmeter.apache.org/
hystrix参考资料: https://docs.spring.io/spring-cloud-netflix/docs/2.2.10.RELEASE/reference/html/