Spring Security-学习笔记
Spring Security
原理
Spring Security 原理上来说是一个过滤器链。
以下列出过滤器链中关键的部分。
UsernamePasswordAuthenticationFilter
用户名密码认证过滤器
ExceptionTranslationFilter
异常转换过滤器
FilterSecurityInterceptor
过滤器安全拦截器,负责授权的
最后再进入原定的API

默认的过滤器链
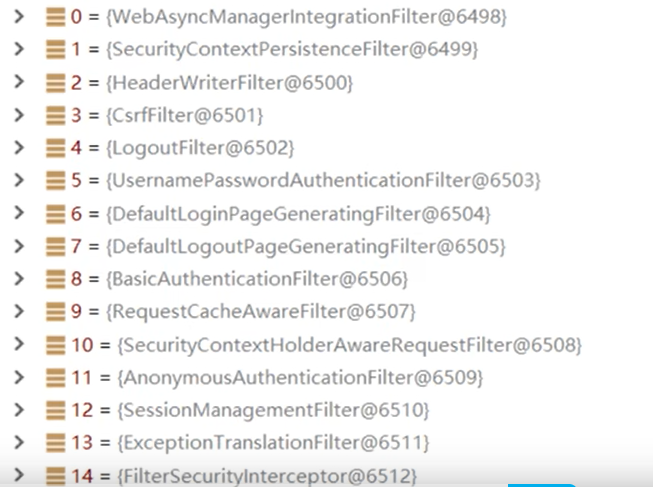
其中DefaultLoginPage…、DefaultLogoutPage…风别是默认登录与默认登出页面。
查看过滤器办法
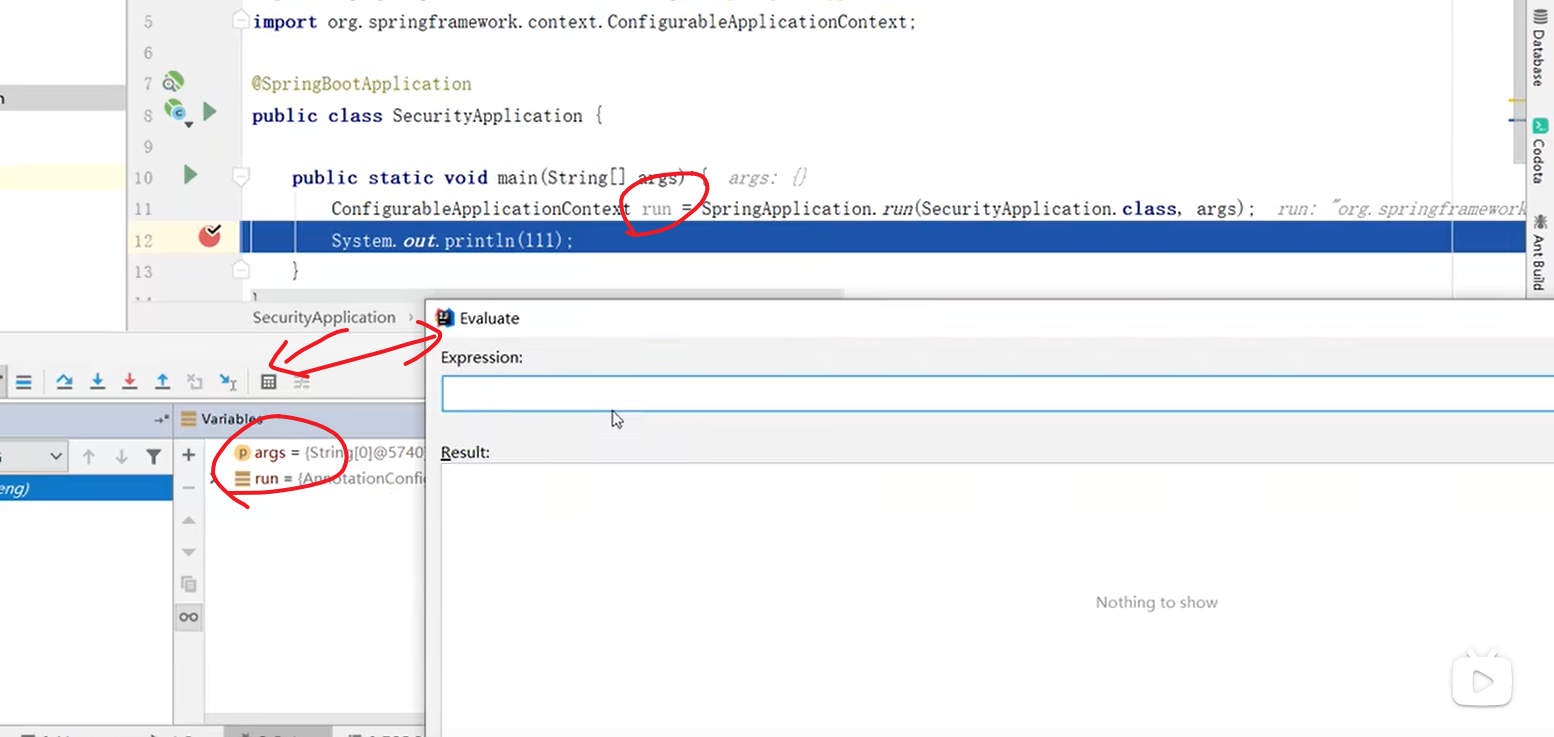
在项目启动后通过debug能查看
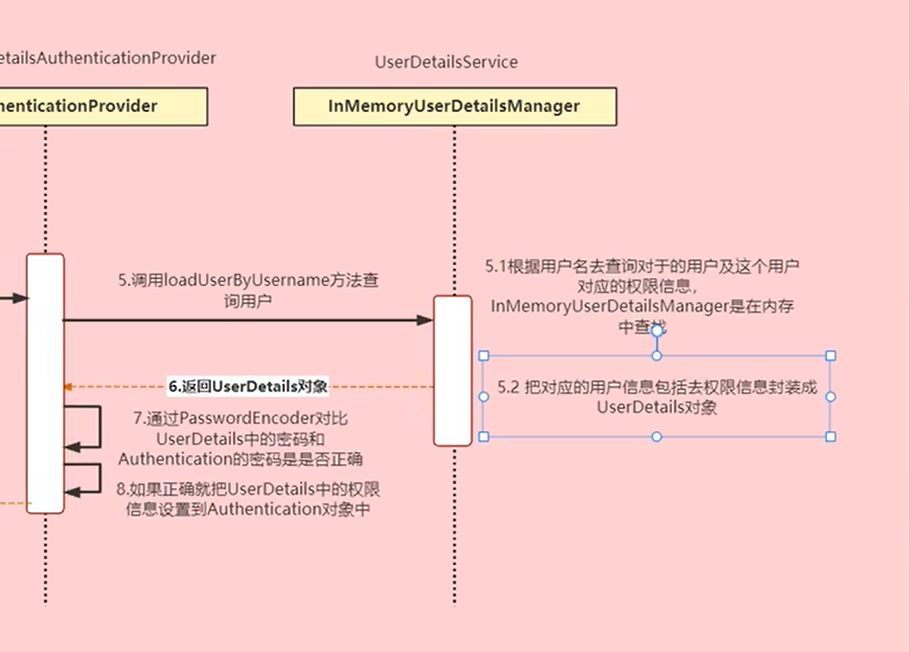
认证流程
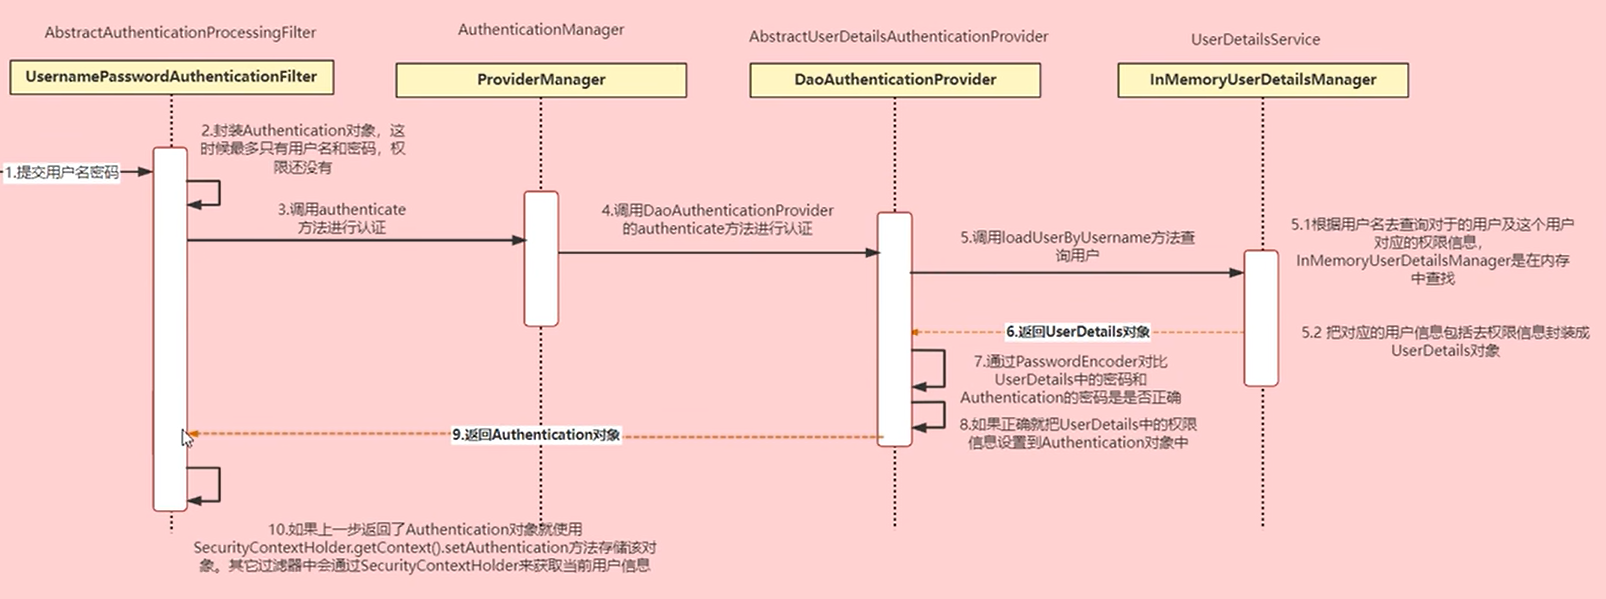
一直调用到UserDetailsService的实现类 InMemoryUserDetailsManager(这是个默认用内存中读取的对象以后换掉)
然后把查询到的用户信息封装成UserDetails。
如果认证成功那么人过滤器会把这个对象给存储到application也就是context中。
后面其他的过滤器会从context中读取
通常一个前后端分离项目要改的地方
重新实现UserDetailsService 因为之前从内存中读取,我们要从数据库中读取。
删除默认登录、登出页。留有接口既可以。
我们不需要UsernamePasswordAuthenticationFilter,而是使用自己的controller
改造ProviderManager,如果成功调用Redis存储用户权限信息。
校验 - 加入一个JWT过滤器,这个过滤器需要读取Redis来验证用户是否登录。
搭建
准备环境
pom
1
2
3
4
5
6
7
8<dependency>
<groupId>org.springframework.boot</groupId>
<artifactId>spring-boot-starter-data-jpa</artifactId>
</dependency>
<dependency>
<groupId>org.springframework.boot</groupId>
<artifactId>spring-boot-starter-data-redis</artifactId>
</dependency>application.yml
1
2
server:
port: 29201
搭建环境
登陆校验的流程,
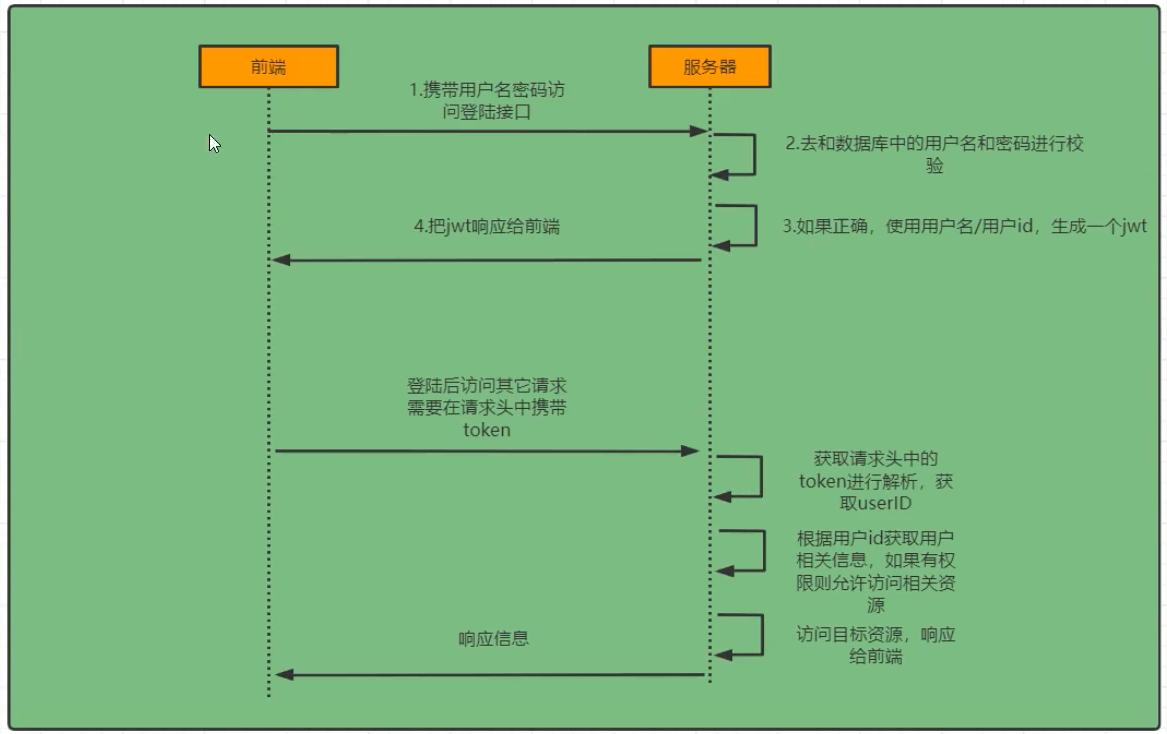
引入security包
1
2
3
4
5
<dependency>
    <groupId>org.springframework.boot</groupId>
    <artifactId>spring-boot-starter-security</artifactId>
</dependency>
引入这个包之后就需要登陆了 默认的用户名是user
搞定JWT与redis
- redis要能够写入读取json
- JWT要可加解密
编写代码
编写代码以适应前后端分离的流程
登录
自定义登录接口
调用ProviderManager的方法进行认证,如果认证成功生成JWT
解密用户密码
吧用户信息和权限信息保存到redis中
自定义UserDetailsService
- 在这个视线中查询数据库
校验
- 定义JWT认证过滤器
- 获取token
- 解析token获取其中的Userid
- 从redis中获取用户信息
- 存入SecurityContextHolder中
- 定义JWT认证过滤器
创建用户
1.替换UserDetailsService 实现类
1 | //查询用户与权限 |
继承UserDetails需要做的事
建立一个基础UserDetails的类并将User类存进去
getAuthorities
获取权限信息
getPWD
getUNAME
isAccoutNonExpired
判断是否没过期
其他boolean类型的暂时都全改成true
加密密码
默认系统回去找PasswordEncoder
所以我们只需要使用@Bean注解将我们需要的加密方式注入进系统就可以了
1 |
|
登录接口
准备AuthenticationManager
通过实现WebSecurityConfigurerAdapter.authenticationManagerBean()
方法并注入到bean来创造AuthenticationManager
调用AuthenticationManager.authentication方法
使用UsernamePasswordAuthenticationToken实现类来调用。
在登录接口login中使用am进行验证,如果验证通过则:
- 存储到redis
- 生成jwt
- 返回
代码如下:
1
2
3
4
5
6
7
8
9
10
11
12
13
14
15
16
17
18
19
20
21
//调用验证
Authentication authentication=null;
try {
authentication = authenticationManager.authenticate(
new UsernamePasswordAuthenticationToken(
coreUser.getEmail(),
coreUser.getPassword()
)
);
}catch (Exception e){
e.printStackTrace();
}
if (Objects.isNull(authentication) || !authentication.isAuthenticated()) {
throw new ServiceException(StatusEnum.ERROR_LOGIN);
}
CoreUserDetails userDetails = (CoreUserDetails) authentication.getPrincipal();
userService.saveUserToStore(userDetails.getCoreUser());
String jwt = jwtUtil.getJwt(userDetails.getCoreUser().getId(), userDetails.getUsername(), userDetails.getCoreUser().getRoles());
return jwt;
}
准备好JWT
认证token
通过过滤器解析、查找redis用户来证明授权。
- 获取token
- 解析token
- 从redis中取得用户信息
- 存入SecurityContextHolder
- 放行
代码如下:
1 | package org.akachi.credit.alpha.security.filter; |
定义过滤器位置
过滤器所在位置必须在FilterSecurityInterceptor
之前否则被拒绝后没机会触发验证。
在SecurityConfig.configure
1 | http.addFilterBefore(jwtAuthenticationTokenFilter, UsernamePasswordAuthenticationFilter.class); |
大量测试
登出接口
不做
长连接时根据tokenId来交互
根据UserID来发信
只要有一个端在线消息就消费
权限代码实现
权限信息需要存储在SecurityContextHolder.Authentication中
在启动类中添加注解@EnableGlobalMethodSecurity(prePostEnabled = true)
在JwtAuthenticationTokenFilter中未完成的部分加入代码
1
2
3
4
5
6SecurityContextHolder.getContext().setAuthentication(
new UsernamePasswordAuthenticationToken(
loginUser, null,
loginUser.getAuthorities()
)
);在LoginUser中实现方法getAuthorities
1
2
3
4
5
6
7
8
public Collection<? extends GrantedAuthority> getAuthorities() {
List<GrantedAuthority> grantedAuthorities = coreUser
.getRoles().stream().
map(e -> new SimpleGrantedAuthority(e.getCode()))
.collect(Collectors.toList());
return grantedAuthorities;
}
异常处理
AuthenticationEntryPointImpl 认证异常处理类
1
2
3
4
5
6
7
8
9
10
public class AccessDeniedHandlerImpl implements AccessDeniedHandler {
Gson gson;
public void handle(HttpServletRequest request, HttpServletResponse response, AccessDeniedException accessDeniedException) throws IOException, ServletException {
ResponseResult result = new ResponseResult(StatusEnum.ERROR_LOGIN);
WebUtils.renderJson(response, gson.toJson(result));
}
}AccessDeniedHandlerImpl 登录异常处理类
1
2
3
4
5
6
7
8
9
10
public class AuthenticationEntryPointImpl implements AuthenticationEntryPoint {
Gson gson;
public void commence(HttpServletRequest request, HttpServletResponse response, AuthenticationException authException) throws IOException, ServletException {
ResponseResult result = new ResponseResult(StatusEnum.ERROR_AUTHENTICATION);
WebUtils.renderJson(response, gson.toJson(result));
}
}
解决跨域问题
除了使用普通方法允许跨域以外还需要配置spring security
正常的配置
1
2
3
4
5
6
7
8
9
10
11
12
13
14
15
16
17
18
19
20
21
22
23
24
25
26
27
28
29
30
31
32
33
34
35
36
37package org.akachi.credit.alpha.config;
import org.springframework.beans.factory.annotation.Value;
import org.springframework.stereotype.Component;
import org.springframework.web.servlet.config.annotation.CorsRegistry;
import org.springframework.web.servlet.config.annotation.WebMvcConfigurer;
/**
* @Author akachi
* @Email zsts@hotmail.com
* @Date 2023/1/19 3:52
*/
public class CorsConfig implements WebMvcConfigurer {
private Boolean debug;
public void addCorsMappings(CorsRegistry registry) {
if (!debug) {
return;
}
//允许跨域的路径。
registry.addMapping("/**")
//允许跨域的域名
.allowedOriginPatterns("*")
//是否允许cookie
.allowCredentials(true)
//允许的请求方式
.allowedMethods("GET", "POST", "DELETE", "PUT")
//设置header属性
.allowedHeaders("*")
//跨域允许时间
.maxAge(3600);
}
}开启spring security的跨域配置
1
//@TODO
自定义权限校验
创建权限校验类
创建任意一个bean并且从context中获取用户
1
2Authentication authentication = SecurityContextHolder.getContext().getAuthentication();
LoginUser loginUser = (LoginUser) authentication.getPrincipal();编写类
1
2
3
4
5
6
7
8
9
10
11
12
13
14
15
16
17
18
19
20
21
22
23
24
25
26
27
28
29
30
31
32
33
34
35
36
37
38
39
40
41
42
43
44
45
46
47
48
49
50
51
52
53
54
55
56
57
58
59
60
61package org.akachi.credit.security.expression;
import org.akachi.credit.alpha.entity.CoreRole;
import org.akachi.credit.alpha.entity.CoreRule;
import org.akachi.credit.alpha.util.UserUtil;
import org.akachi.credit.security.entity.LoginUser;
import org.springframework.beans.factory.annotation.Autowired;
import org.springframework.beans.factory.annotation.Value;
import org.springframework.stereotype.Component;
import java.util.List;
import java.util.regex.Pattern;
/**
* @Author akachi
* @Email zsts@hotmail.com
* @Date 2023/1/19 4:31
*/
public class AkachiExpressionRoot {
UserUtil userUtil;
public String appName;
/**
* @param path 权限字符串路径
* @return
*/
public boolean hasAuthority(String path) {
LoginUser loginUser = userUtil.getUtil();
//获取用户权限
List<CoreRole> roles = loginUser.getCoreUser().getRoles();
//判断用户是否拥有权限
for (CoreRole role : roles) {
if (role.getIsLimit() == true) {
//先判断限制
for (CoreRule rule : role.getRules()) {
String pattern = rule.getApiRegular();
boolean isMatch = Pattern.matches(pattern, path);
if (isMatch) {
return false;
}
}
} else {
//再判断允许
for (CoreRule rule : role.getRules()) {
String pattern = rule.getApiRegular();
boolean isMatch = Pattern.matches(pattern, path);
if (isMatch) {
return true;
}
}
}
}
//默认无权限
return false;
}
}
在注解PreAuthorize中使用@ae来调用我的类
1
问题汇总
spring-test与JPS无法兼容
在TEST的Class头上加入@Transactional注解已解决问题。